The Golden Hour is a classic photographic nutshell that recommends that the best times for recording images are approximately the first hour after sunrise, and the first hour prior to sunset. This concept is so neatly set in the minds of photographers that it has come to suggest that high quality images can only be recorded during the Golden Hour intervals. The point of this series of entries is not so much to debunk the idea, as to provide a practical example of the relatively facile and powerful modern digital processing methods.
We should first consider what it is about the Golden Hour that make this time so special for recording photographic images. During the Golden Hour, the angle of the sun with respect to the horizon is small, certainly less than 15°, so that the light directly from the sun travels a greater distance though the atmosphere; which reduces its intensity, and also produces characteristically relatively long shadows. Moreover, the relative contribution to the overall light intensity from the sky is enhanced. This sky light is characteristically extremely diffuse, e.g., think of the sky as the ultimate light diffuser. In terms of the color of the light, the longer path traveled by the light leads to a relative decrease in the blue component due to dispersion, leaving a relative enrichment in yellow and red components.
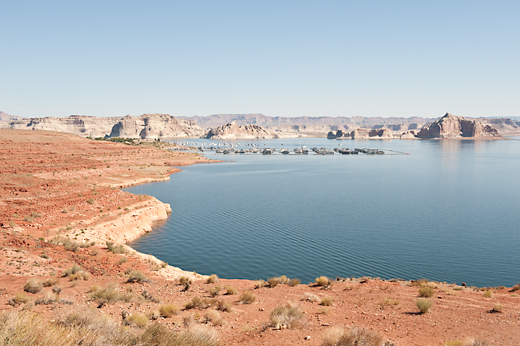
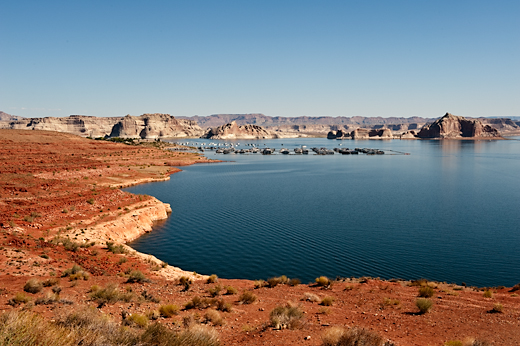
On the day that the image shown above was recorded, August 28, 2009, sunrise occurred at approximately 06:50 MST. The image was recorded at 10:45 MST, well outside of the Golden Hour, and exhibits the overwhelming highlights and deep harsh shadows that are characteristic of images recorded near mid-day. The image was recorded using the Nikon D700 and the AF-S NIKKOR 24-70mm f/2.8G ED lens at 44mm. Exposure was f/16 at 1/125s, ISO at 200.
The image is pretty washed-out/over-exposed. Although we might have been able to do more with an exposure at -0.67 EV, there is little doubt that this image would most probably be more appealing, at least in the classic photographic sense, if it had been recorded between 19:00 and 20:00, since sunset on this date occurred at 20:00 (the image was recorded looking westward, e.g., into the rising sun, not a tractable shooting scenario). The problem was, as it often is, that I wasn’t there during the Golden Hour! Moreover, obviously most life occurs at sometime other than during the Golden Hour. Is there anything we can do to add more pleasing contrast and color saturation to such images? I certainly think so, otherwise I would have written this entry!
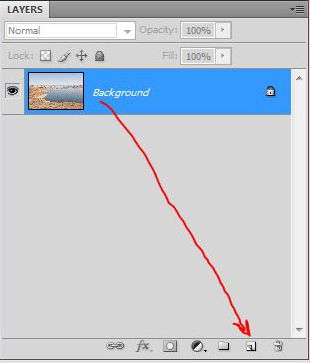
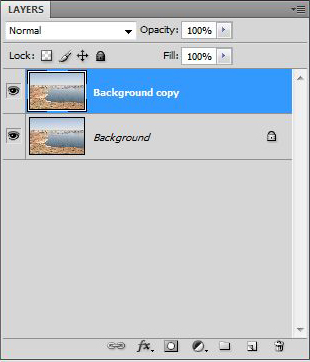
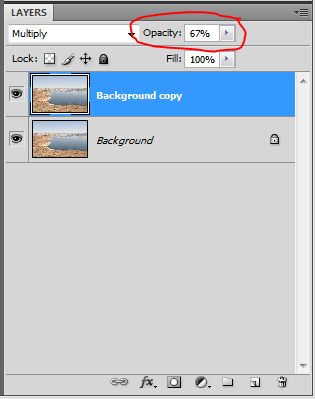
Let’s begin with a simple fix, which is to add a new layer on top of the original layer, and change the blending mode of the new layer to ‘Multiply’. Begin by dragging the Background layer to the copy layer icon, thus generating the Background copy layer as shown below:
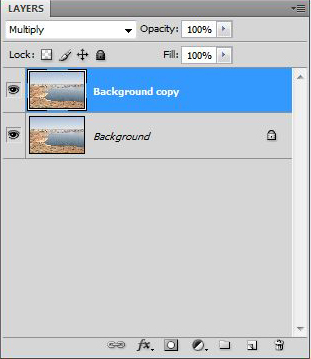
Now change the ‘blending mode’ of the Background copy layer to Multiply as shown below – note that the pull-down menu tab contains a number of blending options – select the downward pointing arrow to the right of ‘Normal’ underneath the Layers tab to reveal them.
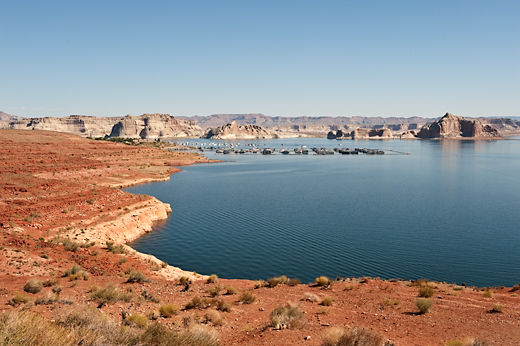
The result is shown below. I’d suggest that there may be no simple move that produces such a dramatically improved result as the addition of a Multiply-layer to a washed-out or overexposed image:
Finally, we can vary the extent of the blending of the top layer into the bottom layer by adjusting the opacity of the top layer.
I hope that you have found this entry to be useful. Good luck on your own efforts. Keep shooting, and don’t believe ’em if they tell you you can’t make solid scenic color images outside of the Golden Hour.
Copyright 2010 Peter F. Flynn. No usage permitted without prior written consent. All rights reserved.
Tags: blending modes, Glen Canyon National Recreation Area, Golden Hour, Lake Powell, Multiply blending layer, Wahweap Marina
Nice post, I am looking forward to trying it for myself. Keep ’em coming.
Hi Wade,
Thanks for the message. Stay tuned!
Cheers,
P.
So what is the program actually doing when you select multiply layers? What is actually going on to give such a stark change in the photo?
Hi David,
The Multiply layer blending mode always produces a darkened result. The way Multiply works is that each pixel on the top layer is multiplied by the value of that same pixel from the layer below, and then that result is divided by 255 so that the result remains within the 0 to 255 RGB range. Let’s consider a nice deep black, say an RGB value of (10, 10, 10), e.g., Red = 10, Green =10, and Blue = 10. If we copy the layer and then change the blend mode to Multiply, we would get for each color component (10*10)/255 or essentially 0, so the new RGB value would be (0, 0, 0). Let’s consider neutral gray then , e.g., (128, 128, 128). If we copy the layer and change the blend mode to Multiply, we get (128*128)/255, or about 64 for each color component, e.g., (64, 64, 64), which is quite a bit darker then what we started with. What would happen if we started with a bright red, e.g., (245, 0, 0) and added a gray layer (128, 128, 128) on top of the red layer. If we change the layer blending mode to Multiply, we get (245*128)/255, or about 123, so the RGB value becomes (123, 0, 0), which is darker than what we started with. Finally, it turns out that white values are unchanged by the Multiply blending mode. Notice that if we start with (255, 255, 255), then copy the layer onto itself and switch the mode to Multiply, we get (255*255)/255, which obviously is just 255, e.g., (255, 255, 255), which is what we started with. If you search the web for a string like ‘arithmetic of the multiply blending mode’, you’ll find tons of stuff.
Cheers,
P.
Thanks for the explanation! Its greatly appreciated.